Introduction
Have you ever spent hours knitting or crocheting a beautiful scarf, sweater, or blanket—only to find it looks misshapen, uneven, or just “off” once it’s done? You’re not alone. Many fiber artists pour their heart into every stitch, only to discover that the final product doesn’t quite match the vision they had in their head. The secret to transforming a good project into a stunning one often lies not in the stitching itself, but in what comes after: blocking.
Blocking is the process of gently shaping and setting your finished fabric using moisture, heat, or steam. Far from being an optional extra, it’s a crucial step that can elevate your handmade items from homemade to handcrafted. In this article, we’ll dive deep into advanced blocking techniques that go beyond the basics—helping you achieve perfectly shaped, symmetrical, and professional-looking projects every time.
Whether you’re working with delicate lace shawls, structured garments, or textured blankets, mastering these methods will give you greater control over your fabric’s final drape, dimensions, and stitch definition. We’ll explore different blocking styles, tools, fiber-specific considerations, and pro tips that seasoned makers use—but rarely talk about. By the end, you’ll feel confident tackling even the most finicky yarns and complex patterns with precision and ease.
Why Blocking Matters More Than You Think
At first glance, blocking might seem like a fussy extra step—especially after you’ve already invested so much time and effort into your project. But think of it this way: blocking is the equivalent of pressing a tailored suit or framing a painting. It’s the finishing touch that reveals your work’s true potential.
Blocking evens out tension inconsistencies, opens up lace patterns, aligns edges, and helps your garment hold its intended shape. Without it, stitches can look cramped, edges may curl, and sizing can be unpredictable. For example, a lace shawl knitted with intricate eyelets might appear dense and closed up straight off the needles—but after a proper wet block, those eyelets blossom into a delicate, airy masterpiece.
More importantly, blocking compensates for the natural quirks of handmade fabric. No matter how consistent your tension, tiny variations occur—especially across large pieces or when multiple skeins of yarn are used. Blocking smooths these out, creating visual harmony. And for wearable items like sweaters or cardigans, it ensures the garment fits as designed, with shoulders that sit correctly and hems that lie flat.
Ignoring blocking is like baking a cake and skipping the frosting—not wrong, but missing a chance to make something truly special. The good news? With the right technique, blocking is simple, satisfying, and transformative.
Wet Blocking: The Gold Standard for Most Fibers
Wet blocking is the most thorough—and often most effective—method, especially for plant-based fibers (like cotton, linen, and bamboo) and animal fibers that can handle full immersion (like wool, alpaca, and mohair).
Here’s how it works:
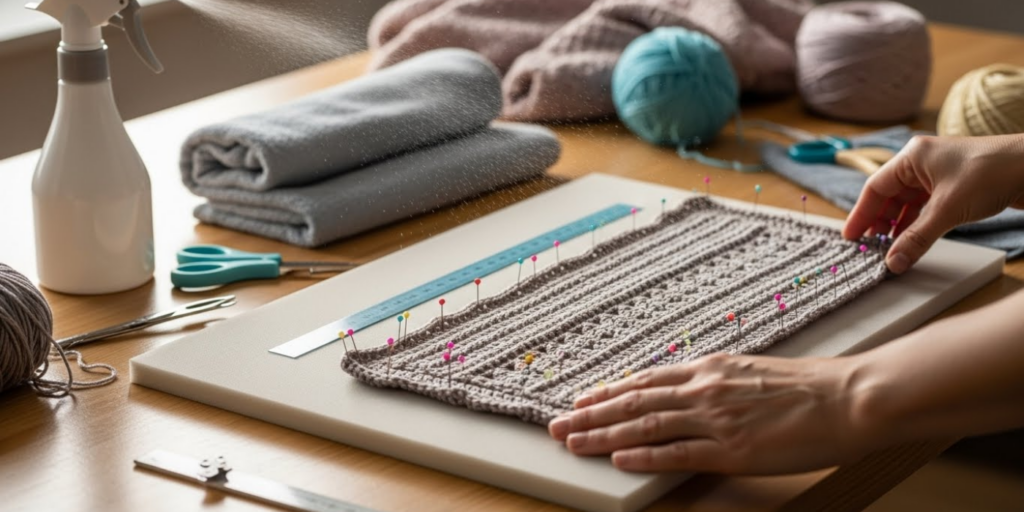
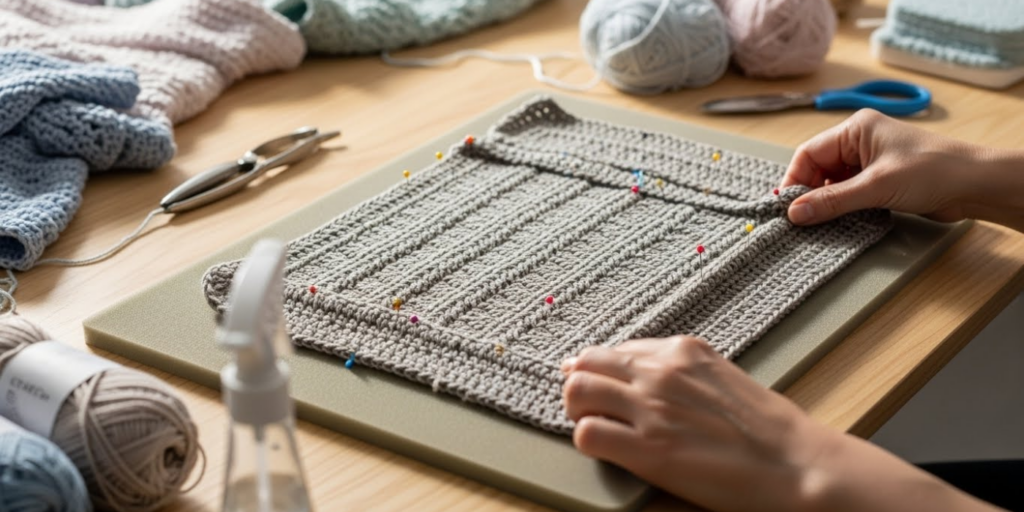
After your project is complete and ends are woven in, submerge it in lukewarm water with a gentle wool wash (never soap or detergent—it can strip natural lanolin or damage fibers). Let it soak for 15–30 minutes. Gently squeeze out excess water (never wring!), then roll the piece in a clean, dry towel to absorb more moisture. Lay it flat on a blocking mat or clean surface, shape it to the correct dimensions, and secure it with rust-proof T-pins.
Pro tip: Use a tape measure and blocking wires for lace projects or straight edges. Wires threaded through the fabric’s perimeter help create crisp, even lines without dozens of pins.
Wet blocking is particularly powerful because it allows fibers to fully relax and reorganize. Wool, for instance, has “memory”—it can stretch and reshape dramatically when wet, then hold that new form as it dries. This makes wet blocking ideal for correcting minor sizing errors or enhancing drape.
When to choose wet blocking:
- Lace shawls or doilies
- Garments that need precise shaping
- Projects made with non-superwash wool or blends
- Any time you want maximum stitch definition and openness
Just remember: never hang a wet-blocked item to dry—it can stretch under its own weight. Always lay it flat.
Steam and Spray Blocking: Gentle Options for Delicate or Structured Fabrics
Not every project can—or should—be soaked. For superwash wool, acrylic, silk blends, or items with embellishments (like beads or sequins), steam or spray blocking offers a gentler alternative.
Spray blocking involves pinning your dry project to shape first, then misting it evenly with water from a spray bottle until damp (not soaked). Let it dry completely before removing pins. This method is low-risk and perfect for beginners or quick touch-ups.
Steam blocking uses the moisture and heat from steam (without direct contact) to relax fibers. Hold a garment steamer or iron (on steam setting, no touch) a few inches above the pinned fabric, moving slowly to distribute steam evenly. Again, allow full drying before unpinning.
These techniques are especially useful for:
- Acrylic yarns (which don’t “felt” like wool but can be heat-set)
- Garments with set-in sleeves or complex construction
- Projects you can’t risk overstretching
- Quick fixes before gifting or photographing your work
Caution: Never apply direct heat to synthetic fibers—they can melt! Always test on a swatch first.
One clever trick? Lightly steam-block acrylic garments to “train” the fibers into holding a specific shape long-term. While acrylic doesn’t have the memory of wool, controlled heat can create semi-permanent results.
Fiber-Specific Strategies: Tailor Your Approach
Not all yarns respond the same way to blocking—and treating them identically can lead to disappointment (or disaster). Understanding your fiber content is half the battle.
Wool and wool blends: These are the stars of blocking. They’re elastic, responsive, and forgiving. Wet blocking works beautifully, and you can stretch them significantly (within reason) to open lace or adjust sizing.
Superwash wool: Treated to be machine-washable, superwash fibers have a smoother surface that doesn’t felt—but they’re also more prone to stretching when wet. Be conservative with dimensions, and consider spray blocking for more control.
Cotton, linen, bamboo: These plant fibers lack elasticity, so they won’t “bounce back” if over-stretched. Wet block to even out stitches, but don’t expect dramatic reshaping. They’ll soften beautifully over time with wear and washing.
Silk: Luxurious but delicate. Use cool water and minimal agitation. Silk can take wet blocking, but many prefer steam for a lighter touch.
Acrylic and synthetics: These don’t absorb water like natural fibers, so wet blocking has limited effect. Instead, use steam blocking to “set” the shape—but keep the iron at a safe distance. Some crafters even use a hairdryer on low heat over a damp, pinned piece for a DIY version.
Blends: When in doubt, block according to the dominant fiber. A 70% wool/30% nylon sock yarn? Treat it like wool. A 60% cotton/40% acrylic tee? Lean toward gentle spray blocking.
Knowing your yarn is like knowing your cooking ingredients—it determines the method, timing, and expected outcome.
Tools and Setup: Elevate Your Blocking Game
You don’t need a fancy studio to block like a pro—but a few key tools make the process faster, more precise, and far more enjoyable.
Essential blocking kit:
- Interlocking foam mats (like those used for kids’ playrooms): lightweight, waterproof, and pin-friendly
- Rust-proof T-pins or blocking pins: long, fine, and sharp enough to pierce multiple layers
- Blocking wires: flexible stainless steel rods that thread through edges for smooth curves and straight lines
- Measuring tape or blocking grid mat: for accurate sizing
- Gentle wool wash (like Soak or Eucalan): no-rinse formulas save time and reduce agitation
- Clean towels: for water absorption
Bonus upgrades:
- A garment steamer for quick touch-ups
- A mesh drying rack for 3D items like hats or sleeves
- A fan to speed up drying in humid climates
Set up your blocking station in a well-ventilated, out-of-the-way spot—blocking can take 24–48 hours to dry fully, depending on fiber and humidity. Pro tip: flip your piece halfway through drying to ensure even airflow.
And don’t forget: always block your swatch before starting a big project. It tells you how your yarn will behave—and could save you from a too-small sweater or a shawl that won’t open up.
Troubleshooting Common Blocking Challenges
Even experienced crafters run into snags. Here’s how to handle them:
Problem: My edges are curling!
Solution: Pin aggressively during blocking. For stockinette stitch, gently stretch the edges outward and downward to encourage them to lie flat. Sometimes a light steam after wet blocking helps “set” the edge.
Problem: My lace isn’t opening up.
Solution: You might not be stretching enough. Lace needs tension to reveal its pattern. Use blocking wires and measure against your pattern schematic. Don’t be afraid to stretch—it’s temporary during drying, but the openness remains.
Problem: My garment stretched too much!
Solution: This often happens with superwash wool or cotton. In the future, block to slightly smaller dimensions than intended—they’ll relax as they dry. If it’s already happened, re-block gently to a tighter shape while damp.
Problem: My acrylic blanket looks “melted” after ironing.
Solution: Never press an iron directly onto acrylic! Use steam from a distance, or switch to spray blocking. Unfortunately, melted fibers can’t be undone—but it’s a valuable lesson in fiber care.
Prevention is key: Always check yarn labels, swatch, and research fiber behavior before committing to a full block.
Beyond Basics: Creative Applications of Advanced Blocking
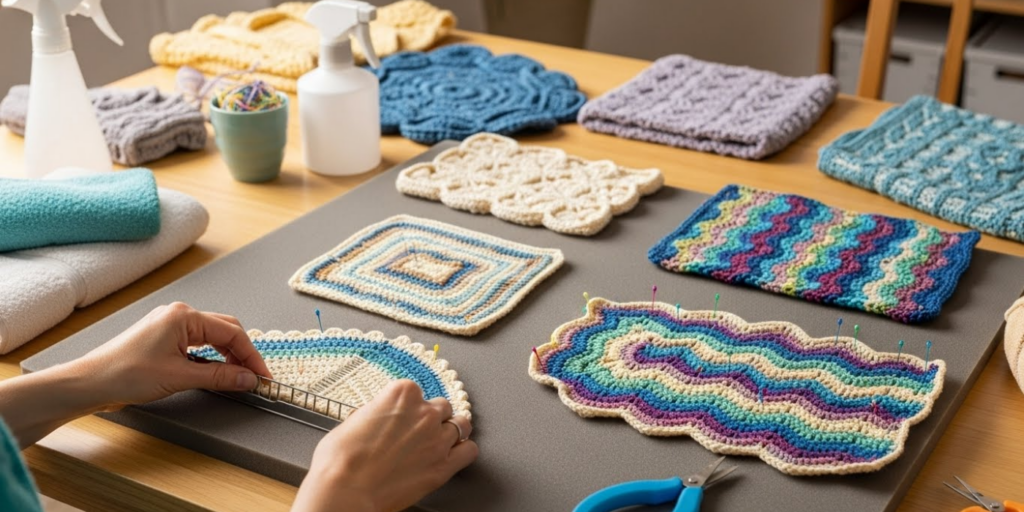
Once you’ve mastered standard blocking, you can use it creatively. Try selective blocking—only wet-blocking certain sections to create dimension. For example, block the body of a sweater but leave the ribbed cuffs slightly tighter for contrast.
Or experiment with textured blocking: press cables or bobbles with your fingers while damp to enhance their definition. For colorwork, blocking evens out tension so your motifs pop uniformly.
Photographers and designers often use blocking to stage pieces perfectly for portfolios or social media. A well-blocked swatch next to your finished item shows professionalism and attention to detail—something clients and followers notice.
And don’t overlook maintenance blocking. Over time, handmade items can lose their shape. A quick re-block every year or two can refresh your favorite cardigan or heirloom shawl, keeping it looking new for decades.
Conclusion
Blocking isn’t just the final step in your crafting journey—it’s where your project truly comes to life. By mastering advanced techniques like fiber-specific wet blocking, steam shaping, and strategic pinning, you unlock the full potential of your handmade creations. You transform uneven stitches into fluid lines, closed lace into airy webs, and misshapen garments into perfect fits.
Remember: blocking is part art, part science. It requires patience, but the payoff is immense. A well-blocked piece doesn’t just look better—it feels better to wear, gift, or display. It reflects your care, skill, and dedication as a maker.
So the next time you bind off your final stitch, don’t rush to wear or wrap your project. Give it the gift of blocking. Pin it, shape it, and watch it evolve into exactly what you envisioned—and maybe even more.
Now it’s your turn: What’s the most dramatic transformation you’ve seen after blocking? Have you ever avoided it—and regretted it later? Share your stories, tips, or questions in the comments below! And if you found this guide helpful, don’t forget to share it with a fellow maker who’s ready to level up their finishing game. Happy blocking!

Gabriela Ferreira is a passionate crochet and knitting enthusiast who finds inspiration in every skein of yarn she touches. With a love for color, texture, and handmade detail, she brings creativity and warmth to each project she creates. Gabriela believes that every stitch tells a story, and she enjoys sharing her craft with others who appreciate the beauty of fiber arts.


