You’ve seen them—soft, colorful blankets draped over couches, delicate doilies on vintage tables, cozy hats perched on heads in winter streets. Maybe you’ve scrolled through Instagram and thought, “I could make that.” And now, here you are: curious, maybe a little nervous, but ready to pick up a hook for the first time. Welcome. You’re about to begin one of the most rewarding, calming, and creatively fulfilling hobbies out there.
Crochet isn’t just about making things—it’s about creating with your hands, slowing down in a fast-paced world, and turning yarn into something beautiful and personal. But before you dive in, there’s one thing you absolutely must do: gather the right tools. Not the fancy, expensive set you saw online. Not the 12-hook variety pack with a case that looks like a unicorn threw up on it. Just the essentials. The real, no-nonsense tools that will carry you from your first shaky stitch to your first finished project.
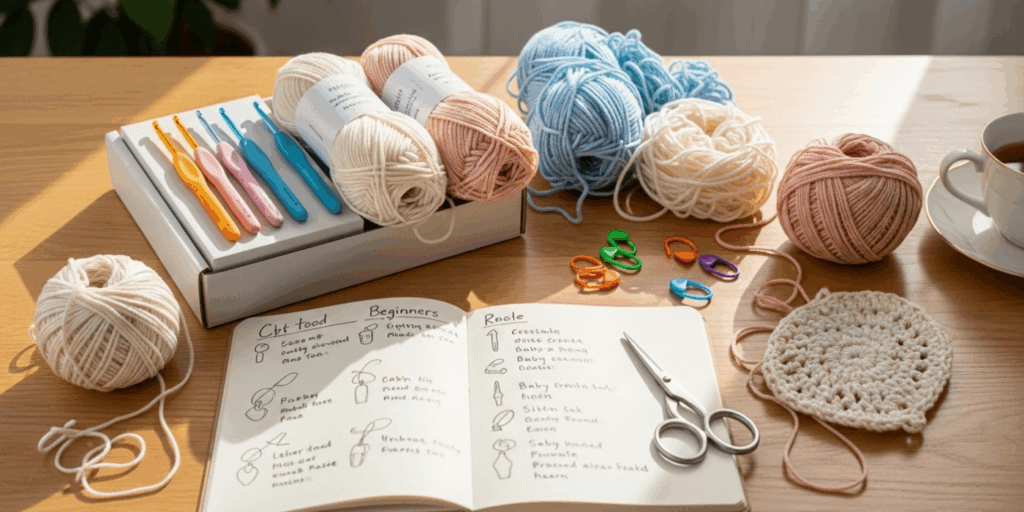
In this guide, we’ll walk through the five beginner crochet tools you truly need before you start—no fluff, no overwhelm. We’ll explain why each one matters, how to choose them without getting lost in options, and even how to save money while doing it. By the end, you won’t just know what to buy—you’ll feel confident, prepared, and excited to make your very first chain stitch.
Let’s get started.
1. The Right Crochet Hook: Your First Best Friend
Think of your crochet hook as your paintbrush. If it’s too heavy, too slippery, or the wrong size, even the most talented artist would struggle. The same goes for crochet.
For beginners, the best hook to start with is a size H/8 (5 mm) in aluminum or ergonomic plastic. Why? Because it’s the Goldilocks of hooks—not too big, not too small. It works perfectly with medium-weight yarn (also called worsted weight or #4), which is the most common and easiest to handle for new crocheters.
Avoid those tiny hooks labeled “B” or “C”—they’re meant for lace or thread crochet, and they’ll make your fingers ache before you even finish a row. And while wooden hooks look beautiful, they can be too sticky for beginners. Aluminum hooks glide smoothly, letting you focus on your stitches, not fighting the tool.
Here’s a simple tip: hold the hook like a pencil—not a knife, not a hammer. Your grip should be relaxed. If your fingers feel tense after five minutes, your hook might be too thick or too thin for your hand.
Many starter kits include a single hook, but if you’re buying solo, look for one with a soft, rubberized grip. Brands like Clover Amour or Boye offer comfortable handles that reduce hand fatigue. And yes, comfort matters—even if you’re only crocheting for 15 minutes a day, your wrists will thank you later.
Pro tip: Don’t buy a hook set with 10 sizes yet. You don’t need them. Start with one. Master it. Then expand.
2. Yarn That Doesn’t Fight Back
You might think any yarn will do. After all, it’s just… yarn, right?
Wrong.
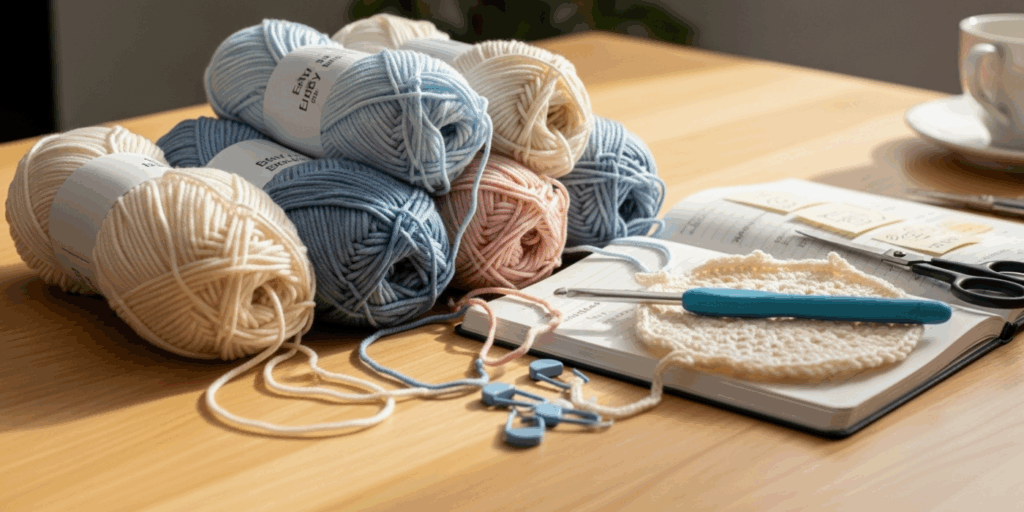
As a beginner, you want yarn that’s smooth, light-colored, and medium-weight. Avoid dark colors (black, navy), fuzzy yarns (like mohair or bouclé), and super thin threads. Why? Because you need to see your stitches. If you can’t tell where your hook went, you’ll get frustrated fast.
Go for 100% acrylic worsted weight yarn in white, cream, or light gray. Brands like Red Heart Super Saver, Lion Brand Basic Stitch, or Caron Simply Soft are perfect. They’re affordable (often under $5 per ball), widely available at craft stores, and forgiving when you make mistakes.
Here’s what happens when you pick the wrong yarn:
You pull a stitch, and it snags.
You try to fix a dropped stitch, but the fibers are too fuzzy—you can’t find the loop.
You unravel your work, and half the yarn comes apart in your hands.
Sound familiar? That’s why starting with the right yarn isn’t optional—it’s essential.
And here’s a game-changer: buy a ball with a label that says “Easy Care” or “Machine Washable.” You’ll make mistakes. You’ll drop your project on the floor. You’ll spill coffee on it (we’ve all been there). Washable yarn means you don’t have to panic—you just toss it in the machine and keep going.
One ball (about 364 yards) is enough for your first project—a simple dishcloth, a coaster, or a tiny granny square. Don’t buy five skeins yet. Start small. Learn. Then expand.
3. Scissors That Actually Cut Yarn (Yes, This Matters)
You’d be surprised how many beginners skip this step—until they’re wrestling with a tangled ball of yarn, trying to snip it with kitchen shears that barely budged.
You need small, sharp scissors—the kind you’d use for embroidery or sewing. Not the big kitchen ones. Not the blunt craft scissors from your kid’s art kit. Look for scissors with a pointed tip and a comfortable grip, ideally under 4 inches long.
Why? Because precision matters. When you finish a project, you need to cut the yarn cleanly so the end doesn’t unravel. When you fix a mistake, you need to snip the yarn exactly where needed—no tugging, no fraying.
A good pair costs less than $5. Look for brands like Fiskars or Gingher. You can even find mini crochet scissors with a handy loop to hang them on your hook case.
Bonus tip: Keep your scissors only for yarn. Don’t use them for paper or fabric. Dull scissors = frustrating crocheting. Sharp scissors = smooth progress.
And here’s a little secret: cut your yarn with a quick, decisive snip—not a slow pull. It makes all the difference.
4. A Tapestry Needle: The Secret Weapon for Finishing
You’ve finished your first scarf. Or maybe your first granny square. Now what? You have a bunch of loose ends sticking out like angry hair strands.
Enter the tapestry needle—also called a yarn needle.
This isn’t your regular sewing needle. It has a large, blunt tip and a big eye to thread thick yarn through. You’ll use it to weave in those pesky ends so they don’t come loose. You’ll use it to sew pieces together (like granny squares into a blanket). You’ll use it to add buttons, embroidery, or even attach pom-poms.
Most beginners don’t realize how vital this tool is until they try to push a yarn end through fabric with tweezers. Trust me—don’t be that person.
Look for a needle with a wide eye (at least 1.5 inches long) and a smooth, rounded tip. You don’t need fancy ones. A pack of 3–5 plastic or steel needles costs less than $3 and will last you years.
How to use it: Thread the end of your yarn through the needle, then weave it back and forth through the back of your stitches for about 2 inches. Trim the excess. That’s it. No knots. No bulk. Just clean, professional-looking finishes.
Pro tip: If you’re using bulky yarn, get a larger needle. If you’re using sport weight, go smaller. But for now—stick with the medium size that comes with your yarn.
5. Stitch Markers: Your Personal Memory Helper

Imagine trying to knit a sweater without counting rows. You’d lose track. You’d get confused. You’d probably cry a little.
That’s what crochet feels like without stitch markers.
These tiny tools—usually plastic rings, metal clips, or even homemade loops of contrasting yarn—help you mark the beginning of a round, count stitches, or remember where your pattern changes.
For beginners, ring-style markers (closed loops) are easiest. You slip them onto your hook between stitches. Some come in bright colors, which helps you spot them quickly.
Why are they so important? Because crochet patterns often repeat every few stitches. If you lose count, you’ll mess up the whole thing. And if you’re making something circular—like a hat or a coaster—you won’t know where your round started unless you mark it.
You don’t need a dozen. Just 3–5 will do. You can even use paper clips or old hair ties as makeshift markers while you’re starting out.
Real-life example: Sarah, a 62-year-old retiree, started crocheting last year. She made 12 dishcloths before she realized she was accidentally adding a stitch every row. She bought 5 stitch markers. Her 13th dishcloth? Perfect. She gave it to her granddaughter.
That’s the power of a tiny tool.
Bonus: A Measuring Tape (Yes, Really)
You might think, “I can eyeball it.” But here’s the truth: if you want your project to turn out the size you expect, you need to measure.
A flexible measuring tape (the kind tailors use) is a small investment—usually under $3—that prevents wasted time and yarn. Want to make a scarf that’s 60 inches long? Measure it. Want to know if your hat fits your head? Measure it. Want to follow a pattern that says “chain 100”? Measure your chain to make sure you didn’t miscount.
Even better—many patterns give sizes in inches, not stitches. So if you’re making a baby blanket and your stitches are too tight, you’ll end up with something the size of a napkin. A measuring tape helps you adjust before you commit.
Keep it in your crochet bag. Use it every time you start a new project. You’ll thank yourself later.
What You Don’t Need (Yet)
Let’s clear up a common myth: you don’t need a project bag, a yarn bowl, a hook organizer, or a crochet pattern book on day one.
Those are nice to have—but not necessary. In fact, buying too much too soon can overwhelm you. You’ll spend more time organizing your supplies than actually crocheting.
Start simple. Hook. Yarn. Scissors. Tapestry needle. Stitch markers. Measuring tape. That’s it.
Once you’ve made your first project—and felt the joy of holding something you made with your own hands—you’ll know exactly what you want to upgrade next.
How to Start Without Breaking the Bank
You don’t need to spend $50 on a “beginner crochet kit” full of junk you’ll never use.
Instead, here’s a budget-friendly starter list:
- Hook: $3–$6 (size H/8)
- Yarn: $3–$5 (1 ball, worsted weight)
- Scissors: $4–$6 (small, sharp)
- Tapestry needle: $2–$3 (pack of 5)
- Stitch markers: $2–$4 (plastic rings)
- Measuring tape: $2–$3
Total: Under $25.
That’s less than the cost of a latte and a pastry. And unlike coffee, this investment lasts for years.
Shop at Walmart, Michaels, Joann, or even Amazon. Look for sales—many stores offer 40–50% off yarn and tools on weekends. Use coupons. Buy in bulk later. But for now? Keep it simple. Keep it affordable.
Your First Project: A Simple Dishcloth
Ready to put your tools to work?
Try this: Make a 7-inch square dishcloth using single crochet stitches.
You’ll need:
- Your H/8 hook
- One ball of worsted weight yarn
- Scissors
- Tapestry needle (to finish)
Instructions (super simple):
- Chain 20.
- In the second chain from the hook, work one single crochet.
- Continue single crocheting across the row (19 stitches).
- Chain 1, turn your work.
- Single crochet in each stitch across.
- Repeat steps 4 and 5 until your square is about 7 inches wide.
- Cut yarn, pull through the last loop.
- Weave in the ends with your tapestry needle.
That’s it. Done in under an hour. And you’ll have something useful—a real, functional item you made yourself.
This isn’t just practice. It’s proof. Proof that you can do this. That you’re capable. That creativity isn’t reserved for “crafty people.” It’s for anyone willing to try.
Final Thoughts: It’s Not About the Tools—It’s About the Journey
Yes, the right tools make crochet easier. But they’re not the magic.
The magic is in your hands.
The quiet moments spent stitching after a long day.
The satisfaction of fixing a mistake and trying again.
The pride when you look at your first finished piece and think, “I made this.”
Your hook won’t make you a better crocheter. Your yarn won’t teach you patience. Only you can do that.
But these five tools? They’re your allies. They remove the friction. They let you focus on what matters: the rhythm of your stitches, the color of your yarn, the peace you find in the process.
So go ahead. Grab your hook. Pick up that yarn. Cut your first strand. Make your first chain.
You don’t need to be perfect.
You don’t need to be fast.
You just need to begin.
And you’ve already taken the first step.
Now it’s your turn.
What’s the first thing you’re going to make? A cozy blanket? A cute amigurumi? A hat for your dog? Drop a comment below—I’d love to hear your plan. And if you found this guide helpful, share it with someone who’s been saying, “I should try crochet…” but hasn’t started yet.
Because everyone deserves to feel the joy of making something with their own two hands.
Happy hooking. 🧶

Gabriela Ferreira is a passionate crochet and knitting enthusiast who finds inspiration in every skein of yarn she touches. With a love for color, texture, and handmade detail, she brings creativity and warmth to each project she creates. Gabriela believes that every stitch tells a story, and she enjoys sharing her craft with others who appreciate the beauty of fiber arts.


