Imagine holding a skein of yarn that glows with colors no store has ever sold—deep indigo bleeding into sunset orange, soft lavender kissed by mint green, or earthy moss tones that shift like leaves in the wind. Now imagine you created that. Not just bought it—made it. That’s the magic of dyeing your own yarn.
If you’ve ever felt limited by what’s available on store shelves—if you’ve stared at a rainbow of commercial yarns and thought, “I wish it was just a little more… me”—then you’re in the right place. Dyeing your own yarn isn’t just a craft; it’s a form of self-expression, a way to turn ordinary fiber into something deeply personal. Whether you’re a knitter, crocheter, weaver, or just someone who loves textures and colors, hand-dyed yarn lets you control every hue, every gradient, every subtle shift in tone.
In this guide, we’ll walk you through everything you need to know as a complete beginner. No prior experience? Perfect. We’ll cover the basics of what supplies you actually need (spoiler: you probably already have most of them), how to choose the right yarn to dye, step-by-step techniques for stunning results, and even how to fix common mistakes without starting over. You’ll learn why hand-dyed yarn feels different—not just visually, but emotionally—and how creating your own colors can transform not just your projects, but your whole creative practice.
By the end, you won’t just know how to dye yarn—you’ll feel confident enough to try it. And once you do? You might never go back to store-bought again.
Why Dyeing Your Own Yarn Changes Everything
Let’s be honest: buying yarn is fun. Walking through a yarn shop, running your fingers over soft merino, smelling the wool, picking out the perfect shade… it’s a sensory experience. But here’s the catch—most commercially dyed yarns are made in bulk. Colors are standardized, predictable, and often repetitive. That “ocean blue” you love? It’s the same blue as ten other skeins you’ve already bought.
Hand-dyed yarn, on the other hand, is alive with variation. No two skeins are exactly alike. One might have speckles of gold that catch the light like sunlight on water. Another might fade from deep plum to whisper-soft rose, like a twilight sky. These subtle differences aren’t flaws—they’re stories. And when you dye your own yarn, you get to write those stories.
Beyond aesthetics, there’s a deeper satisfaction. Think about it: when you knit a sweater from yarn you dyed yourself, you’re not just wearing a garment—you’re wearing your creativity, your patience, your experimentation. It becomes more than a project. It becomes a keepsake.
And here’s the best part: you don’t need a studio or a degree in chemistry. You can start today—with a pot, some vinegar, and a packet of food coloring from your pantry. Many beginners start with food-safe dyes because they’re affordable, non-toxic, and easy to clean up. As you grow more confident, you can explore professional fiber dyes—but for now, simplicity is your superpower.
The rise of handmade and slow crafts has made dyeing yarn more popular than ever. According to a 2024 Craft Yarn Council survey, over 62% of knitters and crocheters now prefer hand-dyed or self-dyed yarns over mass-produced options. Why? Because they crave uniqueness. They want to create things that feel real—not manufactured.
So if you’ve ever felt like your projects were “just okay,” dyeing your own yarn might be the spark you’ve been missing. It turns crafting from a hobby into an art form—one where you’re not just following patterns, but designing colors too.
What Yarn Should You Start With? (Spoiler: Not All Yarns Are Created Equal)
Not every yarn will take dye the same way—and that’s okay. In fact, knowing which yarns work best is the secret to avoiding disappointment on your first try.
The golden rule? Natural fibers dye beautifully. Synthetic fibers? Not so much.
Stick with these for your first attempts:
- Wool (especially superwash merino): The superstar of dyeing. It absorbs color like a sponge and holds it beautifully. Superwash wool is treated to be machine-washable, which makes it beginner-friendly.
- Silk: Adds a gorgeous sheen and takes dye with incredible depth. A little expensive, but a small skein goes a long way for practice.
- Alpaca: Soft, warm, and takes dye richly. It doesn’t have much elasticity, so it’s best for scarves or blankets—not socks.
- Cotton, Linen, Bamboo: These plant-based fibers can be dyed, but they need a different chemical helper called sodium carbonate (also called soda ash) to bond the dye properly. Save these for your second or third project.
Avoid acrylic, nylon, polyester, or blends with more than 20% synthetic content. They’ll either absorb dye poorly or end up looking muddy and uneven. I learned this the hard way—my first attempt was a 70% acrylic blend. I spent hours carefully applying dye… and ended up with a pale, washed-out mess. Lesson learned.
Here’s a simple trick to test if your yarn will dye well: The Water Test. Fill a bowl with warm water and drop in a small piece of yarn. If the water turns cloudy or colored within a minute, it’s likely a natural fiber and will dye well. If the water stays clear? Probably synthetic.
Also, consider the base color. White or cream yarns are ideal for beginners because they let the dye show true. Light gray or natural undyed yarns can work too—but avoid dark or pre-dyed yarns. You’re not painting over a mural—you’re starting with a blank canvas.
Pro tip: Buy your yarn in hanks (loose loops), not balls or cakes. Hanks allow the dye to flow evenly around the entire strand. If you only have a cake, unwind it gently into a hank before dyeing. It takes 10 minutes, but it’s worth it.
Your first skein should be small—around 100 grams. That’s enough for a hat or mittens, and it won’t break the bank if things go sideways (which they might!). Remember: this isn’t about perfection. It’s about discovery.
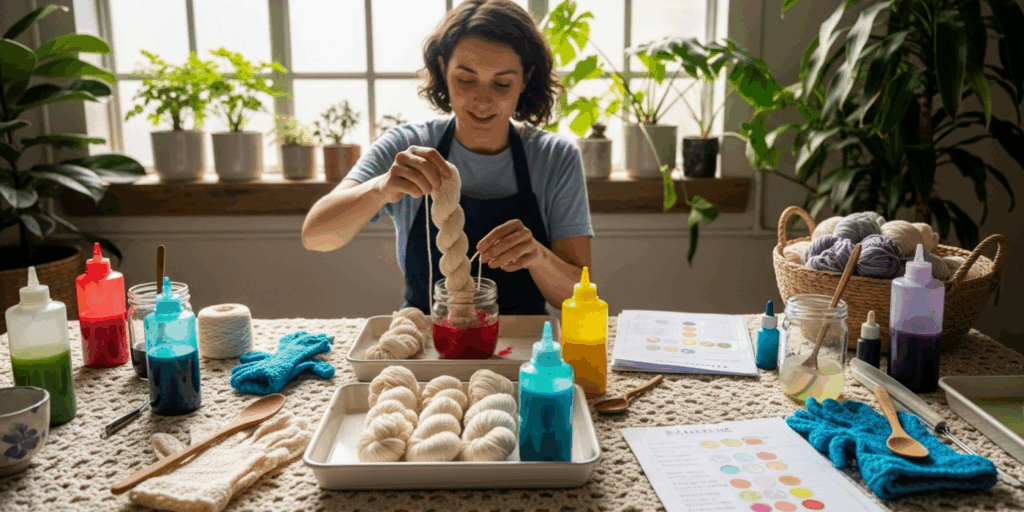
Your Starter Kit: What You Actually Need (No Fancy Gear Required)
You don’t need a $300 dyeing station. Seriously. Many of the best hand-dyed yarns in the world were made in someone’s kitchen sink.
Here’s your true beginner’s kit—everything you need to get started, all under $50:
- A large pot (stainless steel or enamel—not aluminum, which can react with dye)
- A heat source (your stovetop works fine)
- Measuring spoons and cups
- Rubber gloves (yes, even with food coloring—your hands will thank you later)
- Old towels or a plastic drop cloth (dye stains everything)
- String or yarn ties (to secure your hank—use cotton twine or zip ties)
- White vinegar (for wool and silk—helps set the color)
- Food coloring or Kool-Aid packets (yes, really—these are safe, cheap, and colorful)
- A large bowl or bucket (for rinsing)
- A clothesline or drying rack
That’s it. No fancy dyes, no immersion tanks, no digital scales (yet). You’re not running a factory—you’re making art in your own space.
Why vinegar? It acts as a mordant—a helper that lets the dye bond to the fiber. For wool and silk, mix 1 part white vinegar to 4 parts water. Soak your yarn in it for 20 minutes before dyeing. It’s like prepping a canvas with primer.
Why food coloring? It’s non-toxic, readily available, and comes in vibrant shades. A single packet of Kool-Aid (unsweetened!) can dye a full 100g skein. Cherry, grape, lemon-lime—they all work. Try mixing them: grape + lemon-lime = unexpected pastel purple. You’re not just dyeing yarn—you’re playing with color theory.
Pro tip: Use squeeze bottles (like old ketchup bottles) to apply dye precisely. Fill them with diluted food coloring and “paint” your yarn like a watercolor artist. This is how you create gradients, speckles, and variegated effects.
And here’s the biggest myth busted: You don’t need to be artistic. Even if you think you “can’t draw,” you can still make stunning yarn. Some of the most beautiful hand-dyed skeins are the result of happy accidents—drips, splashes, and blobs that turned into magic.
Start small. Start simple. Start messy. That’s how real creativity begins.
Step-by-Step: Dyeing Your First Skein (No Fear, No Fuss)
Let’s walk through dyeing your first skein—step by step, like a friend guiding you through their kitchen.
Step 1: Prep Your Yarn
Unwind your hank and tie it loosely in 4–6 places with cotton string (like a “figure 8”). This keeps it from tangling. Soak it in warm water mixed with 1 cup white vinegar for 20 minutes. Squeeze out excess water—don’t wring! Just gently press.
Step 2: Prepare Your Dye Bath
Fill your pot with 2–3 inches of water. Bring it to a gentle simmer—not a rolling boil. Too hot, and your wool can felt (turn into a fuzzy, shrunk mess). Add your dye:
- For food coloring: 10–20 drops per color
- For Kool-Aid: 1 packet per 100g of yarn
You can use one color for a solid look, or multiple for a variegated effect.
Step 3: Add the Yarn
Lay your soaked hank gently into the pot. Use a spoon or chopstick to nudge it under the water. Don’t stir. Let it sit. The heat will slowly draw the dye into the fibers.
Step 4: Heat and Wait
Simmer on low for 20–30 minutes. You’ll see the water turn clear—that means the dye has been absorbed. Turn off the heat. Let the yarn cool in the pot until it’s warm to the touch (about 30 minutes). This helps the color set.
Step 5: Rinse and Dry
Rinse under cool running water until the water runs clear. Wrap in a towel and gently squeeze out water. Hang to dry on a line or rack—away from direct sunlight, which can fade colors.
And… that’s it.
I remember my first skein: I used three Kool-Aid packets—cherry, orange, and lime. I didn’t plan anything. I just dropped them in. When I pulled it out, it looked like a sunset had been spun into wool. I cried a little. Not because it was perfect—but because it was mine.
That’s the power of this process. You’re not following a recipe. You’re creating a moment.
Troubleshooting Common Mistakes (and How to Fix Them)
Let’s get real: not every dye job will be a masterpiece. And that’s okay. Here are the top 3 beginner mistakes—and how to fix them without tossing your yarn.
Mistake #1: Colors look muddy or gray.
Cause: Too many colors mixed too quickly, or using synthetic yarn.
Fix: Start with just 1–2 colors. Let them sit separately on the yarn before steaming or simmering. If it’s already muddy? Try re-dyeing with a lighter color—it can brighten things up.
Mistake #2: Uneven dyeing—patches of white or pale spots.
Cause: Yarn wasn’t fully soaked, or it was bunched up.
Fix: Next time, tie your hank looser and make sure it’s submerged. Use a spoon to gently roll the yarn around in the dye bath. Think of it like turning a rotisserie chicken—you want even exposure.
Mistake #3: Color bleeds when washed.
Cause: Dye wasn’t properly set.
Fix: Always use vinegar for wool. For future projects, try a post-dye soak in cold water with 1 tablespoon of vinegar. Let it sit for 10 minutes before rinsing. Also, always wash your finished projects separately the first time.
One more tip: Keep a dye journal. Write down what you used, how much, and what happened. Was the water too hot? Did you leave it longer? This becomes your personal recipe book—and you’ll start seeing patterns in your own creativity.
Remember: Even professional dyers have “oops” skeins. The difference? They keep going. And so should you.
The Joy of Creating Something Truly Unique
There’s a quiet magic in knowing that the yarn in your hands was once just water, vinegar, and a few drops of color. That it didn’t come from a factory. That you, with your own two hands, transformed it.
Hand-dyed yarn connects you to traditions older than modern manufacturing. For centuries, people dyed fibers with plants, insects, and minerals. Indigo from leaves. Crimson from beetles. Yellow from onion skins. Today, we have food coloring and Kool-Aid—but the soul of the process is the same.
When you knit with your own dyed yarn, you’re not just making a scarf or a hat. You’re wearing a memory. The day you tried Kool-Aid and laughed as your fingers turned purple. The time you accidentally spilled raspberry juice and created a stunning gradient. The quiet morning you sat by the window, watching your yarn dry, feeling proud of something you made—not bought.
This isn’t just a craft. It’s a practice in mindfulness. In patience. In letting go of perfection.
And here’s the beautiful truth: You don’t have to be good at it to enjoy it. You just have to try.
So go ahead. Grab a skein. Pour some dye. Let your inner artist play.
Your next project doesn’t need to be perfect. It just needs to be yours.
Ready to Try It? Here’s Your Next Step
You now have everything you need to dye your first skein. No excuses. No fancy tools. No fear.
So here’s my challenge to you:
This week, buy one small skein of white merino wool. Pick one Kool-Aid flavor you love. And dye it.
Don’t overthink it. Don’t wait for the “right time.” Do it while the coffee’s still warm. Do it with your favorite music playing. Do it because you deserve to create something that only you could make.
When you’re done, take a photo. Post it. Share it. Tag someone who also loves yarn. Or keep it private—your secret masterpiece.
Either way, you’ve taken a step most people never do. You didn’t just consume craft—you created it.
And that? That changes everything.
Now I’d love to hear from you:
What color will you try first? And what will you make with it? Drop your ideas in the comments below—I read every one. And if you’ve already dyed your own yarn, tell us your favorite “happy accident.” Let’s build a community of color-lovers, one skein at a time.

Gabriela Ferreira is a passionate crochet and knitting enthusiast who finds inspiration in every skein of yarn she touches. With a love for color, texture, and handmade detail, she brings creativity and warmth to each project she creates. Gabriela believes that every stitch tells a story, and she enjoys sharing her craft with others who appreciate the beauty of fiber arts.


